Research shows that companies that actively map customer journeys achieve 54% higher returns on marketing investment and experience sales cycles that are 18% faster than those of organizations that don’t use journey mapping.
Whether you’ve already tried mapping customer journeys or you’re looking for fresh ideas to update your existing maps, this guide has you covered.
We’ll walk through how to build a customer journey map step by step in 10 simple stages.
How To Create A Customer Journey Map — A Step-by-Step Process
Below are 10 steps to create your first customer journey map or refine an existing one.
1) Get clear on your objectives
A customer journey map can serve many purposes, and involving multiple teams can easily blur its focus. That’s why defining your goal upfront is essential.
Your objectives might include:
- Understanding how users move through your brand
- Mapping a multi-channel marketing approach
- Laying the groundwork for a new marketing campaign
- Identifying and understanding new market segments
- Re-engaging an existing audience
- Pinpointing areas for testing and optimization
- Increasing acquisition or conversion rates
These are just a few examples. Before you begin, decide exactly what you want the journey map to achieve. In mapping the outcome, whether you want to automate replies on Instagram or use a LinkedIn widget to embed a LinkedIn feed. A clear goal helps define the scope and keeps the project focused from start to finish.
2) Assemble the A-Team
Because customers interact with multiple points of your organization, your customer journey mapping team should be cross-functional. Bring together stakeholders from across the business to ensure the map reflects real, end-to-end customer experiences.
This typically includes representatives from:
- Marketing and communications
- Sales and product development
- Software engineers and front-end developers
- Fulfillment, order management, and shipping partners
- Customer service teams
- Executive stakeholders
In many cases, customer journey mapping is an iterative effort. One core team may draft the initial version, with additional teams providing feedback and insights over time to enhance the map’s depth, accuracy, and clarity.
3) Forget Complicated Templates
If you search for “customer journey map template,” you’ll find hundreds of examples showing different formats and structures.
While these can be useful for inspiration, it’s important to remember that every business and every customer journey is different.
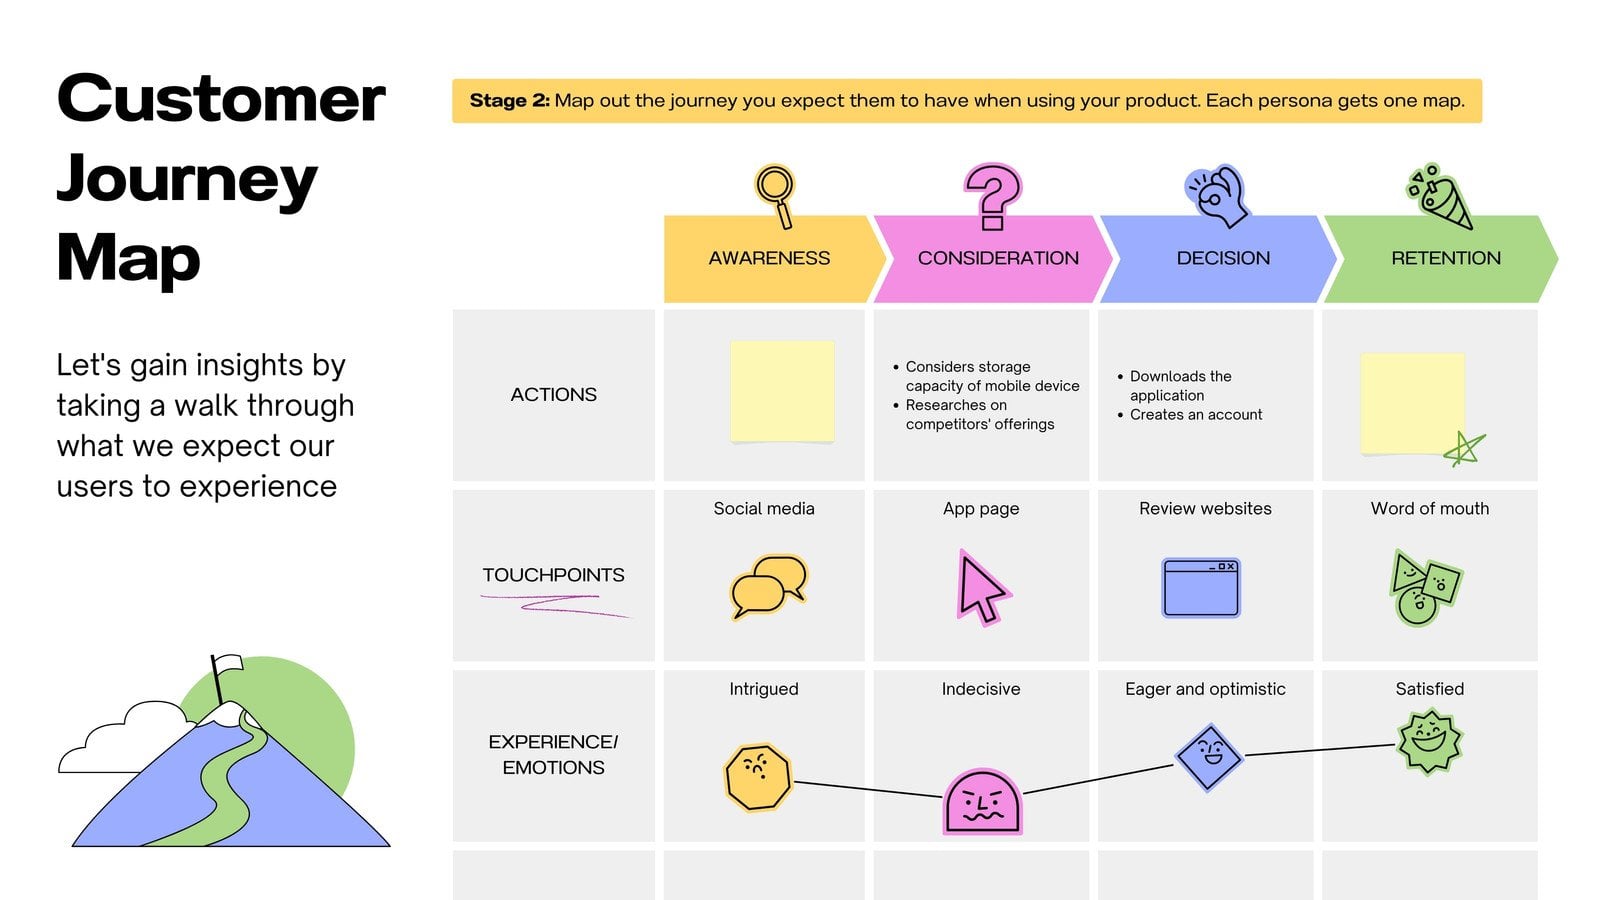
Your customer journey may not fit neatly into a predefined template, and that’s perfectly fine. A map doesn’t need to look polished or complex to be useful. What matters most is clarity and accuracy.
Start simple. Use pen and paper, sticky notes, whiteboards, or basic mind maps to capture ideas and touchpoints. Once the journey is clear and validated, you can refine the layout or hand it off to a design team to create a more formal version if needed.
4) Start with Your Customer Personas
A customer journey can look very different depending on the persona you’re mapping. That’s why a journey map shouldn’t be built from the brand’s point of view, but from an honest, evidence-based view of how customers actually experience your business.
Begin by understanding persona. Start with their needs, expectations, and behaviors, not the point of sale or internal processes.
It’s important to repeat this exercise for each of your key personas. Doing so allows you to tailor experiences more precisely, which directly impacts satisfaction.
With 55% of consumers willing to pay more for a consistently good experience, getting personalization right is worth the effort. A customer-first journey strategy plays a major role in long-term loyalty and satisfaction.
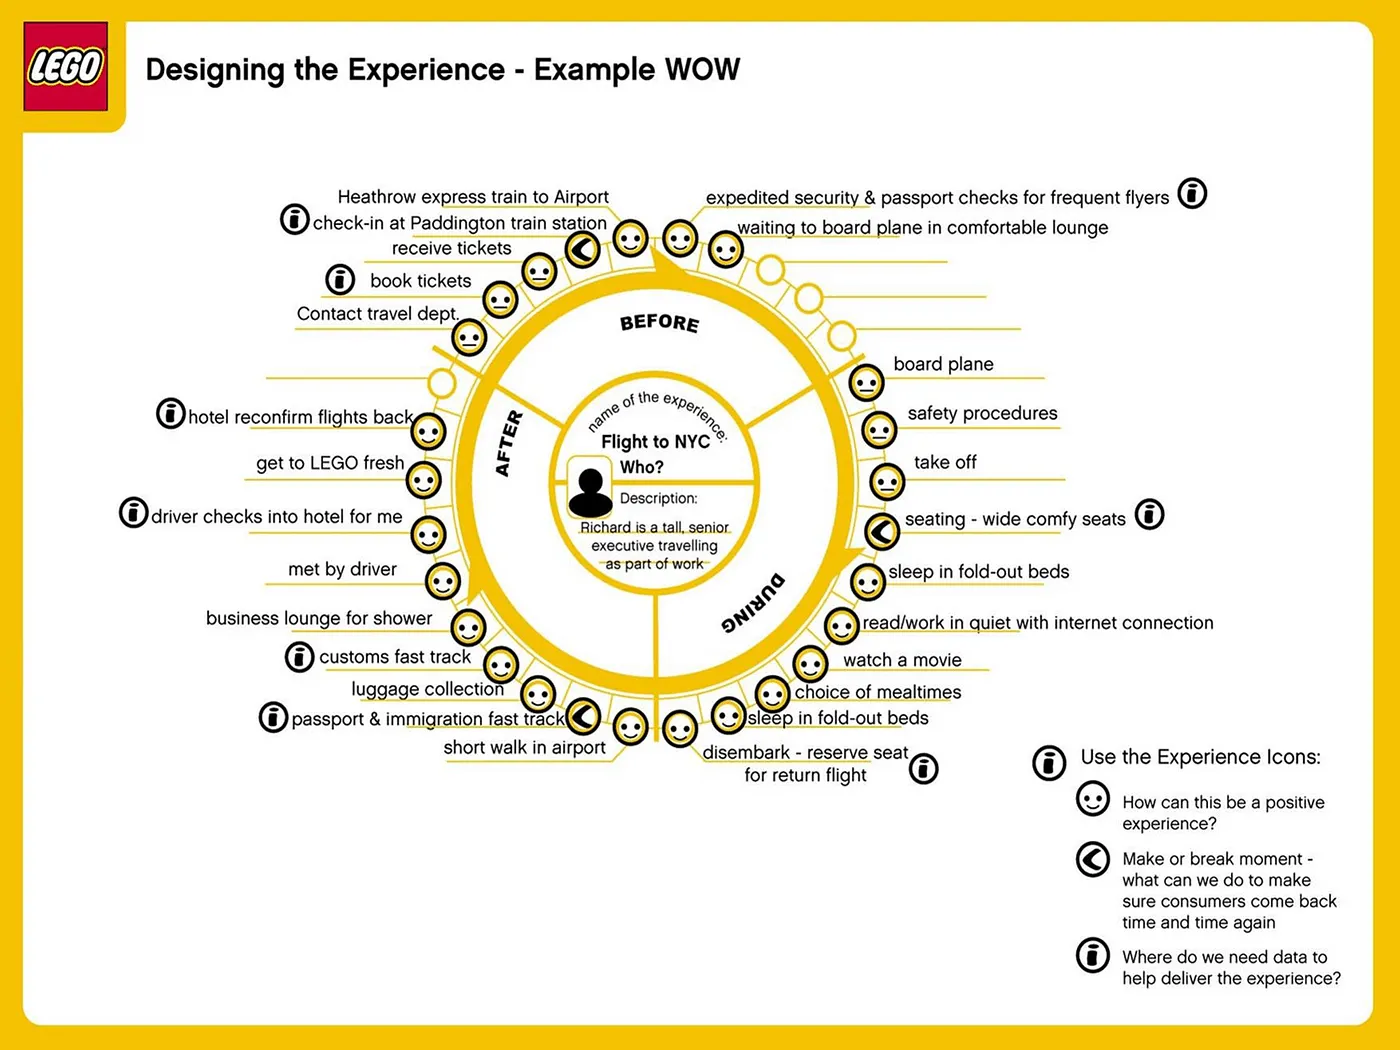
A strong example comes from LEGO’s customer experience team.
In one of their journey maps, a business traveler flying to New York is placed at the center of the experience. The map reflects that persona’s specific needs and priorities, showing how different touchpoints support (or hinder) their journey.
5) Gather Your Data
We’ve mentioned the word quantitative a few times, and that’s intentional. The strongest customer journey maps are grounded in data. Even the most experienced marketers’ assumptions about how people interact with a brand need validation. Useful data points to collect include:
- Macro and micro conversion rates
- Traffic by channel
- Navigation paths (entry points, next steps, and exit points)
- Bounce rates, cart abandonment, and exit rates
- Peak hours, days, and seasonal trends
Most of this information is available through your analytics tools. The challenge is turning raw numbers into a clear, visual story that shows how customers actually move through your journey. This can be challenging if you’re short on time or lack deep analytics expertise.
Another risk is data overload. With so much information available, it’s easy to spend time analyzing metrics that don’t meaningfully influence decisions.
6) Start Mapping Your Touchpoints
You likely have more customer touchpoints than you realize.
A touchpoint is any moment where a customer interacts with your brand. This can include email marketing campaigns, social media, chatbots, customer support calls, voice search, ads, your website, or even billing messages.
Start by listing every possible touchpoint across the customer lifecycle. Don’t filter, yet capture everything. Once you have the full list, identify which touchpoints matter most for your business and your customers.
From there, begin plotting these touchpoints along the customer journey. This helps you see how interactions connect, where customers move smoothly, and where friction or drop-offs may occur.
At this stage, aligning your touchpoint mapping with a clearly defined CRM strategy can help centralize customer data and ensure consistent tracking of every interaction across teams. This creates better visibility into how marketing, sales, and support efforts influence the overall experience.
Clearly mapping touchpoints lays the groundwork for improving the overall experience.
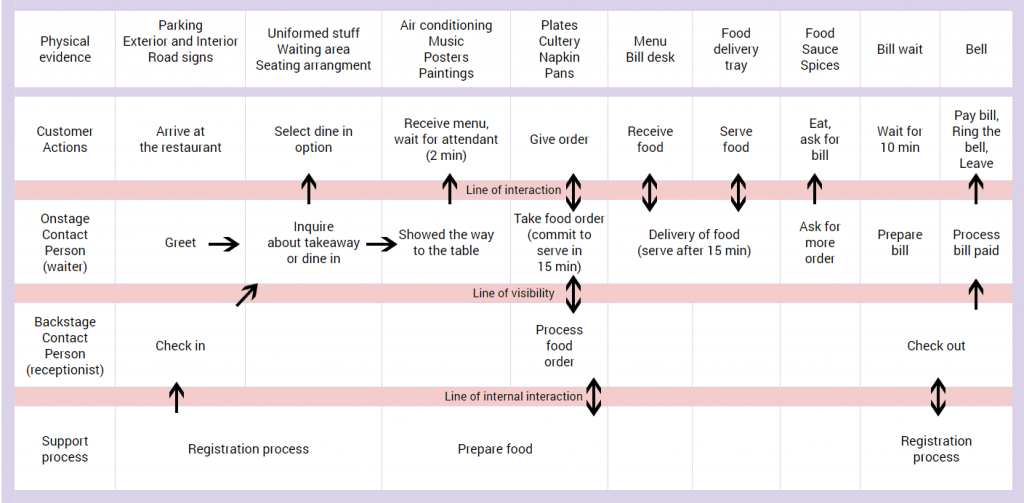
7) Include the Internal Actions
The previous step focused on the customer’s journey, but it’s just as important to capture what happens behind the scenes. For instance, when a customer raises a complaint on Facebook, where does that request go internally, and how is it handled and resolved?
Many of these internal actions aren’t visible to customers, but documenting them helps you clearly connect internal workflows to customer-facing moments. This not only improves the journey map but also highlights inefficiencies, gaps, or delays within your processes.
To clarify, consider color-coding internal actions triggered by customer behavior. This visual distinction helps teams understand how internal teams, systems, and support functions interact with the customer journey.
In the pizza restaurant example, customer actions, touchpoints, and backstage processes are mapped side by side, showing how each internal step supports the overall experience.
8) Add Timelines to the Customer Journey Map
Understanding when things happen is just as important as understanding where they happen. Add timelines to your customer journey map to track how long it takes for customers to move between touchpoints, such as from first discovering your brand to making a purchase, from a first order to a repeat purchase, or from asking a chatbot question to adding an item to their cart.
These time intervals reveal valuable insights. They help identify friction points, delays, and moments where customers hesitate or drop off, as well as areas where the journey flows smoothly and quickly. This makes it easier to spot opportunities to improve speed, clarity, or engagement.
Time of day is another key factor to consider. When working with high customer volumes, patterns around peak hours often emerge. Recognizing when customers are most active or when certain requests spike can help teams better plan resources, reduce bottlenecks, and address pain points more efficiently.
9) Pay Attention to Customer Emotions
Customer behavior is heavily influenced by emotion and psychology. When you understand how customers feel at each stage of the journey, you can respond in ways that better support their needs and expectations.
For instance, if customers are curious at the awareness stage, provide clear and informative content to help them learn more. If they feel uncertain, introduce reassurance signals such as reviews, guarantees, or limited-time prompts to encourage action. If frustration arises, focus on fixing the specific part of the journey that’s causing it.
10) Note Your Evaluation Criteria and Metrics
Document the key metrics for each touchpoint to measure the impact of changes over time.
For example, if you’re targeting idle browsers to encourage them to complete a purchase, record the current conversion rate. This provides a clear baseline for comparing new tactics and helps you identify what’s working and what isn’t.
Tracking metrics alongside each touchpoint also highlights weak spots in the journey that may need attention, such as resolution times in AI customer service chats, where slow responses can lead to cart abandonment.
Common metrics to include are:
- Bounce rate
- Average time on page
- Average order value (AOV)
- New vs. returning customer order value
Since it’s often difficult to gauge performance in isolation, external benchmarks and industry data can be helpful. They allow you to see how your journey compares to competitors and identify areas where improvement could have the greatest impact.
Airbnb: Fixing Booking Friction with Better Listing Photos
When Airbnb examined the customer booking journey, the company focused on the moment when travelers decide whether to reserve a property. Journey analysis showed that many potential guests dropped off during the listing evaluation stage.
One clear friction point was the quality and consistency of listing photos. Many hosts uploaded dark, blurry, or poorly framed images, making properties appear less trustworthy and making it harder for guests to envision the stay.
From a traveler’s perspective, photos are the closest substitute for visiting the property in person. When images looked unprofessional, users often hesitated to continue the booking process. This created a gap in the journey between initial interest and final reservation.
To address this issue, Airbnb introduced a professional photography program for hosts. The company partnered with photographers who could visit properties and take high-quality photos that accurately represented the space. These photos highlighted key features, including room layout, lighting, amenities, and the surrounding areas. The goal was to reduce uncertainty during the decision stage and give travelers a clearer view of what they would experience.
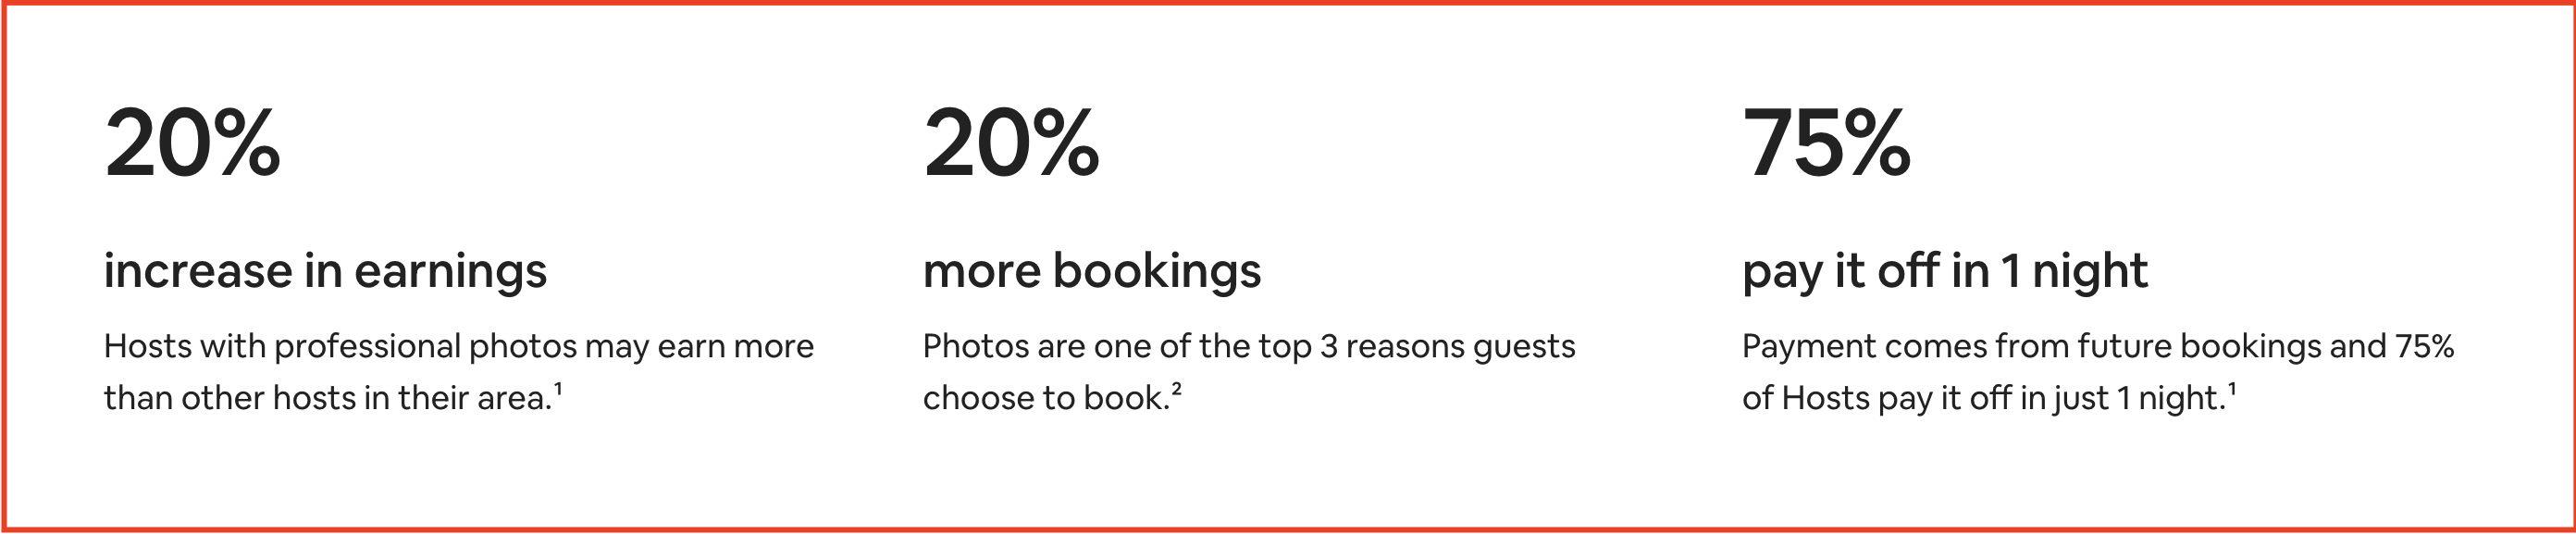
The results were significant. Listings with professional photos received 2.5 times as many bookings as those with standard host-uploaded images. In addition to improving booking rates, higher-quality photos also increased guest confidence and allowed many hosts to charge slightly higher nightly rates.
This example shows how analyzing the customer journey can reveal friction that may not be obvious at first. In Airbnb’s case, the problem was not pricing or availability but visual trust during the evaluation stage. By improving one key touchpoint in the journey, listing photos, the company made the booking process smoother and increased conversions.
Conclusion and Next Steps
While customer journey mapping may feel like a large undertaking at first, it’s one of the most practical tools marketers can use to design clear, thoughtful, and customer-focused experiences. A well-built journey map helps you understand how people move across touchpoints, where friction appears, and how to improve conversions by aligning experiences with real customer expectations and needs.
Once you’ve created a solid customer journey map, it shouldn’t sit untouched. Revisit it regularly when shaping marketing strategies, launching new channels, or refining existing touchpoints. It works best as a living reference rather than a one-time exercise.